This guide will help you set up Ecommerce tracking on Google Analytics and your website, find and create Ecommerce reports, and become comfortable using it.
Ecommerce combines your regular Google Analytics data with your inventory and sales to effectively draw smart insights. Did you know that Ecommerce tracking works wonderfully not only for e-shops but for SaaS apps too?
Let's dive right in.
Contents
Google Analytics Ecommerce
What is Google Analytics Ecommerce?
Google Analytics Ecommerce is an addition to the standard GA set up. It adds more metrics related to the nature of ecommerce, like revenue, purchases, and transactions. Typically, you want to have this additional data about your e-shop and combine it with standard metrics. It creates a whole new set of possibilities to make the right decisions. You'll be able to see which marketing efforts help to boost sales, what items are selling the best, your revenue split, etc.
Google Analytics Ecommerce is your old Analytics data, enriched with your inventory and sales numbers.
Should you use Google Analytics Ecommerce?
If you operate an ecommerce store and want to understand your visitors, you have to use some analytics/reporting system. When you're only using a standard Google Analytics set up or your traditional administration system to see sales, it's hard to see a clear picture. Questions like, "which source of traffic have the biggest purchase value?" or "does the running marketing campaign impact the average order value?" gets unanswered. By using Ecommerce tracking, you can solve this problem, as the traffic and sales data merge with your Google Analytics data.
You should use Google Analytics Ecommerce tracking if you're already using GA and selling items.
How to enable Ecommerce tracking on Google Analytics.
For the Ecommerce tracking set up, you'll need to enable it on the Google Analytics admin panel and modify the GA tracking code on your website.
To enable it on your website:
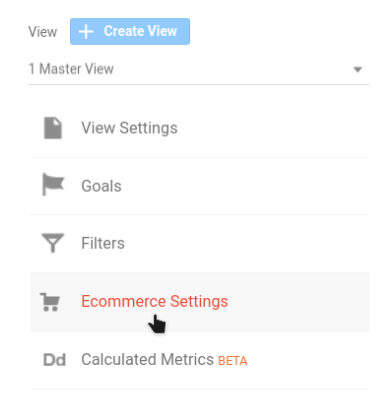
- Go to the "Admin" section
- Under the "View" column, click on "Ecommerce Settings"
- Flip the switch to the on position, under "Enable Ecommerce"
- Finally, click the "Save" button;
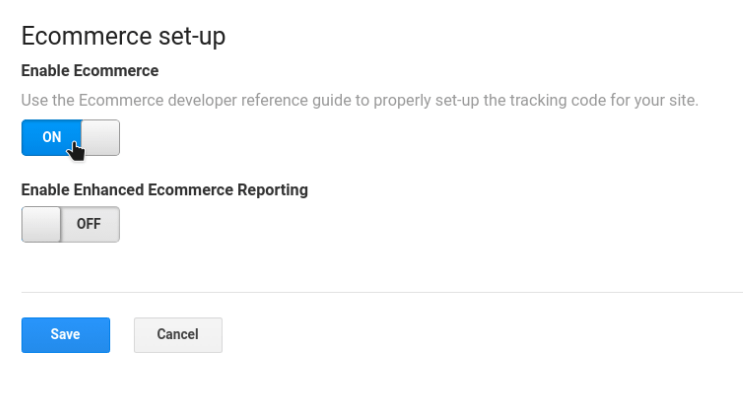
Please note that you can find the website code part in the developer guides section.
Google Analytics Enhanced Ecommerce
Enhanced Ecommerce differences.
Google Analytics Enhanced Ecommerce is an addition to the standard Ecommerce tracking. While the standard Ecommerce tracks transactions and helps you identify your traffic channel revenue, best selling products, and general sales, it has its limits. Enhanced Ecommerce allows you to access broader metrics, create more reports, and use segmentation, based on the Enhanced Ecommerce events. You can split and segment which users bounced from your conversion funnel, which products were added or removed from their shopping carts, or identify other trends. However, it can be a bit time consuming to perform a proper set up of Enhanced Ecommerce. It takes some planning and developer efforts, more than enabling standard Ecommerce tracking.
Enhanced Ecommerce provides a clearer view of your data and more depth to analyze it. However, it requires a lot more work to set up, than standard Ecommerce tracking.
Should you enable Google Analytics Enhanced Ecommerce?
As Enhanced Ecommerce provides more depth to your data, the benefits are a lot bigger too. Standard Ecommerce doesn't track such important metrics like profit margin, discounts applied, promotions used, or buying funnel statistics. This additional data can be used by any part of your business, from marketing to UX, to sales. So if you're interested in those, you should enable it.
If you're serious about investigating your users' behavior and find that standard Ecommerce tracking does not answer your business questions, you should implement Enhanced Ecommerce.
How to enable Enhanced Ecommerce.
As with standard Ecommerce tracking, there are two steps to enable Enhanced Ecommerce.You need to enable it on the Google Analytics admin panel, and set up your website to send the data.
To enable it on your website:
- Go to the "Admin" section
- Under the "View" column, click on "Ecommerce Settings"
- Ensure that the general "Enable Ecommerce" switch is on
- Under the "View" column, click on "Ecommerce Settings"
- Flip the switch to the on position, under "Enable Enhanced Ecommerce Reporting"
- Finally, click the "Save" button
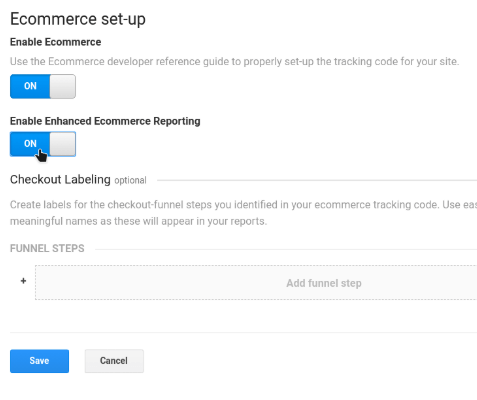
Simply enabling it will add a few new reports into your Google Analytics, but they'll be empty. You'll need to send additional data from your website. Enabling Enhanced ecommerce without sending that data doesn't break anything, so that you can do it in advance.
Please note that you can find the website code part in the developer guides section.
Google Analytics Ecommerce tracking (developer guides)
Set up standard Ecommerce tracking on your website.
After enabling Ecommerce tracking on Google Analytics, you should perform a few changes for your website too.
This guide assumes that you've already added the Google Analytics basic page tracking code, and are using analytics.js (instead of Google Tag Manager), which utilizes ga() function calls.
For standard Ecommerce tracking, you should add additional JavaScript code that sends your transaction (sales) and product (items) data after each purchase. Usually, after a customer performs a transaction, you redirect him to the dedicated "Thank you," order confirmation, or receipt page. On that page, you should place a call to Google Analytics, registering the event.
Let's see the example below.
![]()
Copy this Snippet
  // ... Your website
  // ... Standard analytics code
  <script type="text/javascript">
    // When initializing an Ecommerce plugin, it must be placed AFTER your Google Analytics code.
    ga('require', 'ecommerce');

    // Create a transaction object
    ga('ecommerce:addTransaction', {
      'id': '123456789',                // Unique transaction ID, in your system. Required.
      'affiliation': 'My Store',        // Store name.
      'revenue': '55.5',                // Grand Total.
      'shipping': '10',                 // Shipping cost.
      'tax': '5.39'                     // Tax amount.
    });

    // Attach individual items to transaction
    ga('ecommerce:addItem', {
      'id': '123456789',                // Transaction ID specified previously. Required.
      'name': 'Socks',                  // Product name. Required.
      'sku': 'SCKS0001',                // SKU/code.
      'category': 'Clothing',           // Category or variation.
      'price': '5.55',                  // Single item price.
      'quantity': '10'                  // Quantity.
    });

    // Once you've added all items, send the transaction to Google Analytics
    ga('ecommerce:send');
  </script>
Once you perform ga('ecommerce:send');, all the data will be automatically pushed to Google Analytics, and the shopping cart will be cleared. You'll have to add new transactions/items again to send them.
If you would like to clear the cart, instead of sending it, use ga('ecommerce:clear');
You can also specify currencies in the ISO 4217 standard. To learn more, head to the Currency reference.
If your e-shop location is on a different domain to the main website, you should use a Cross-domain set up.
Do not mix standard Ecommerce tracking with the Enhanced Ecommerce tracking code! For more information about Enhanced Ecommerce, see the next section.
Set up Enhanced Ecommerce tracking on your website.
After enabling Enhanced Ecommerce tracking in Google Analytics, you should also perform a few changes on your website.
This guide assumes that you've already added the Google Analytics basic page tracking code, and are using analytics.js (instead of Google Tag Manager), which utilizes ga() function calls.
While standard Ecommerce tracking allows you to track transactions and items, Enhanced Ecommerce provides a way to investigate the whole buying funnel. You can measure product impressions and clicks, adding a product to the cart, refunds, discounts, and other useful information.
If you already use standard Ecommerce, you can either add a new property or migrate existing code to utilize the new functionality. This guide will focus on the latter option.
For Enhanced Ecommerce tracking, there are a lot more data types.
- Impression data allows you to know which items were viewed in your e-shop.
- Product data shows individual products that were added to your shopping cart.
- Promotion data represents all the promotions/discounts/offers that customers might view.
- Action data stores all the customer actions performed on your store.
- Product and Promotion actions allow the interpretation of data sent to Google Analytics. For example, clicks, detail views, adding or removing from a shopping cart, purchases, etc.
It's worth mentioning that Enhanced Ecommerce data can only be sent during an analytics pageview or event. There is no ecommerce data sent, if the pageview is already sent (for example, with ga('send', 'pageview');), or not sent after the ecommerce actions are specified. Always double-check after configuring ecommerce commands, that you also send a pageview or event!
Now, let's go straight to the Google Analytics ecommerce tracking example:
![]()
Copy this Snippet
  // ... Your website
  // ... Standard analytics code, but WITHOUT ga('send', 'pageview');
  <script type="text/javascript">

    // Example 1: Create a product impression

    ga('ec:addImpression', {            // Provide product details in an impressionFieldObject.
      'id': '123456789',                // Product ID (string). Required ID, or name.
      'name': 'Black Socks',            // Product name (string). Required ID, or name.
      'category': 'Clothing',           // Product category (string).
      'brand': 'Acme',                  // Product brand (string).
      'variant': 'Black',               // Product variant (string).
      'list': 'Search Results',         // Product list (string).
      'position': 1,                    // Product position (number).
      'dimension1': 'ExistingCustomer'  // Custom dimension (string).
    });

    // Example 2: Log a click, happened on a product in a list of search results

    ga('ec:addProduct', {               // Provide product details in a productFieldObject.
      'id': '123456789',                // Product ID (string). Required ID, or name.
      'name': 'Black Socks',            // Product name (string). Required ID, or name.
      'category': 'Clothing',           // Product category (string).
      'brand': 'Acme',                  // Product brand (string).
      'variant': 'Black',               // Product variant (string).
      'position': 1,                    // Product position (number).
      'dimension1': 'ExistingCustomer'  // Custom dimension (string).
    });

    ga('ec:setAction', 'click', {       // click action.
      'list': 'Search Results'          // Product list (string).
    });

    // Example 3: Combining impression, and a click (Examples 1 and 2 combined)

    // The impression from a Related Products section.
    ga('ec:addImpression', {            // Provide product details in an impressionFieldObject.
      'id': '987654321',                // Product ID (string). Required ID, or name.
      'name': 'White Socks',            // Product name (string). Required ID, or name.
      'category': 'Clothing',           // Product category (string).
      'brand': 'Acme',                  // Product brand (string).
      'variant': 'White',               // Product variant (string).
      'list': 'Related Products',       // Product list (string).
      'position': 1,                    // Product position (number).
    });

    ga('ec:addProduct', {               // Provide product details in a productFieldObject.
      'id': '123456789',                // Product ID (string). Required ID, or name.
      'name': 'Black Socks',            // Product name (string). Required ID, or name.
      'category': 'Clothing',           // Product category (string).
      'brand': 'Acme',                  // Product brand (string).
      'variant': 'Black',               // Product variant (string).
      'position': 2,                    // Product position (number).
    });

    ga('ec:setAction', 'click', {       // click action.
      'list': 'Search Results'          // Product list (string).
    });

    // Example 4: Measure a transaction

    ga('ec:addProduct', {               // Provide product details in a productFieldObject.
      'id': '123456789',                // Product ID (string). Required ID, or name.
      'name': 'Black Socks',            // Product name (string). Required ID, or name.
      'category': 'Clothing',           // Product category (string).
      'brand': 'Acme',                  // Product brand (string).
      'variant': 'Black',               // Product variant (string).
      'price': '5.50',                  // Product price (number).
      'coupon': 'SOCKSFTW',             // Product coupon (string).
      'quantity': 1                     // Product quantity (number).
    });

    ga('ec:setAction', 'purchase', {        // Transaction details are provided in an actionFieldObject.
      'id': 'T12345',                       // (Required if it's purchase, or refund) Transaction id (string).
      'affiliation': 'My Store',            // Store name.
      'revenue': '7.50',                    // Revenue (number).
      'tax': '0.50',                        // Tax (number).
      'shipping': '1.5',                    // Shipping (number).
      'coupon': 'SALE2022'                  // Transaction coupon (string).
    });

    // Example 5: Refund an entire transaction

    ga('ec:setAction', 'refund', {
      'id': 'T12345'    // Transaction ID is only required field for full refund.
    });

    // Example 6: Refund a single product

    ga('ec:addProduct', {
      'id': '123456789',    // Product ID is required for partial refund.
      'quantity': 1         // Quantity is required for partial refund.
    });

    ga('ec:setAction', 'refund', {
      'id': 'T12345',       // Transaction ID is required for partial refund.
    });

    // Final notes

    // Once you've added all items, send the pageview together with all Ecommerce data to Google Analytics
    ga('send', 'pageview');

    // Note, if you performed some of these actions (like refund), instead of a user, you should send a non-interaction event before the pageview
    ga('send', 'event', 'Ecommerce', 'Refund', {'nonInteraction': 1});
  </script>
Although the given examples already make your integration quite advanced. The real power of Enhanced Ecommerce comes from measuring your checkout steps. It allows you to see which actions in your buying funnel require some tweaks, where the users drop, etc. To do so, you'll need to follow these three steps:
- Optionally, set user-friendly names for the checkout process in the admin section of the Ecommerce configuration
- Add JavaScript code to track each step of your buying funnel
- Optionally add code to measure checkout options
To add checkout steps, go to the ecommerce settings page, and you'll see "Funnel Steps." Under this section, add the names of each step in the correct sequence.
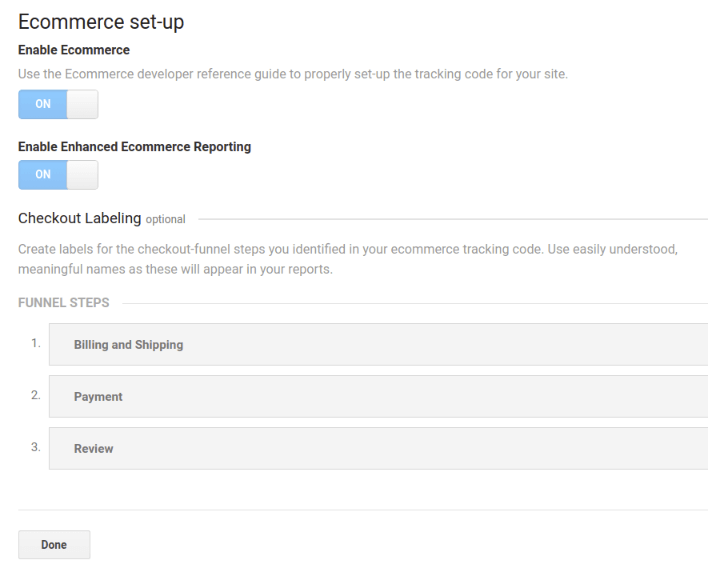
You’ll then need to send a pageview/event on each of those steps from your website.
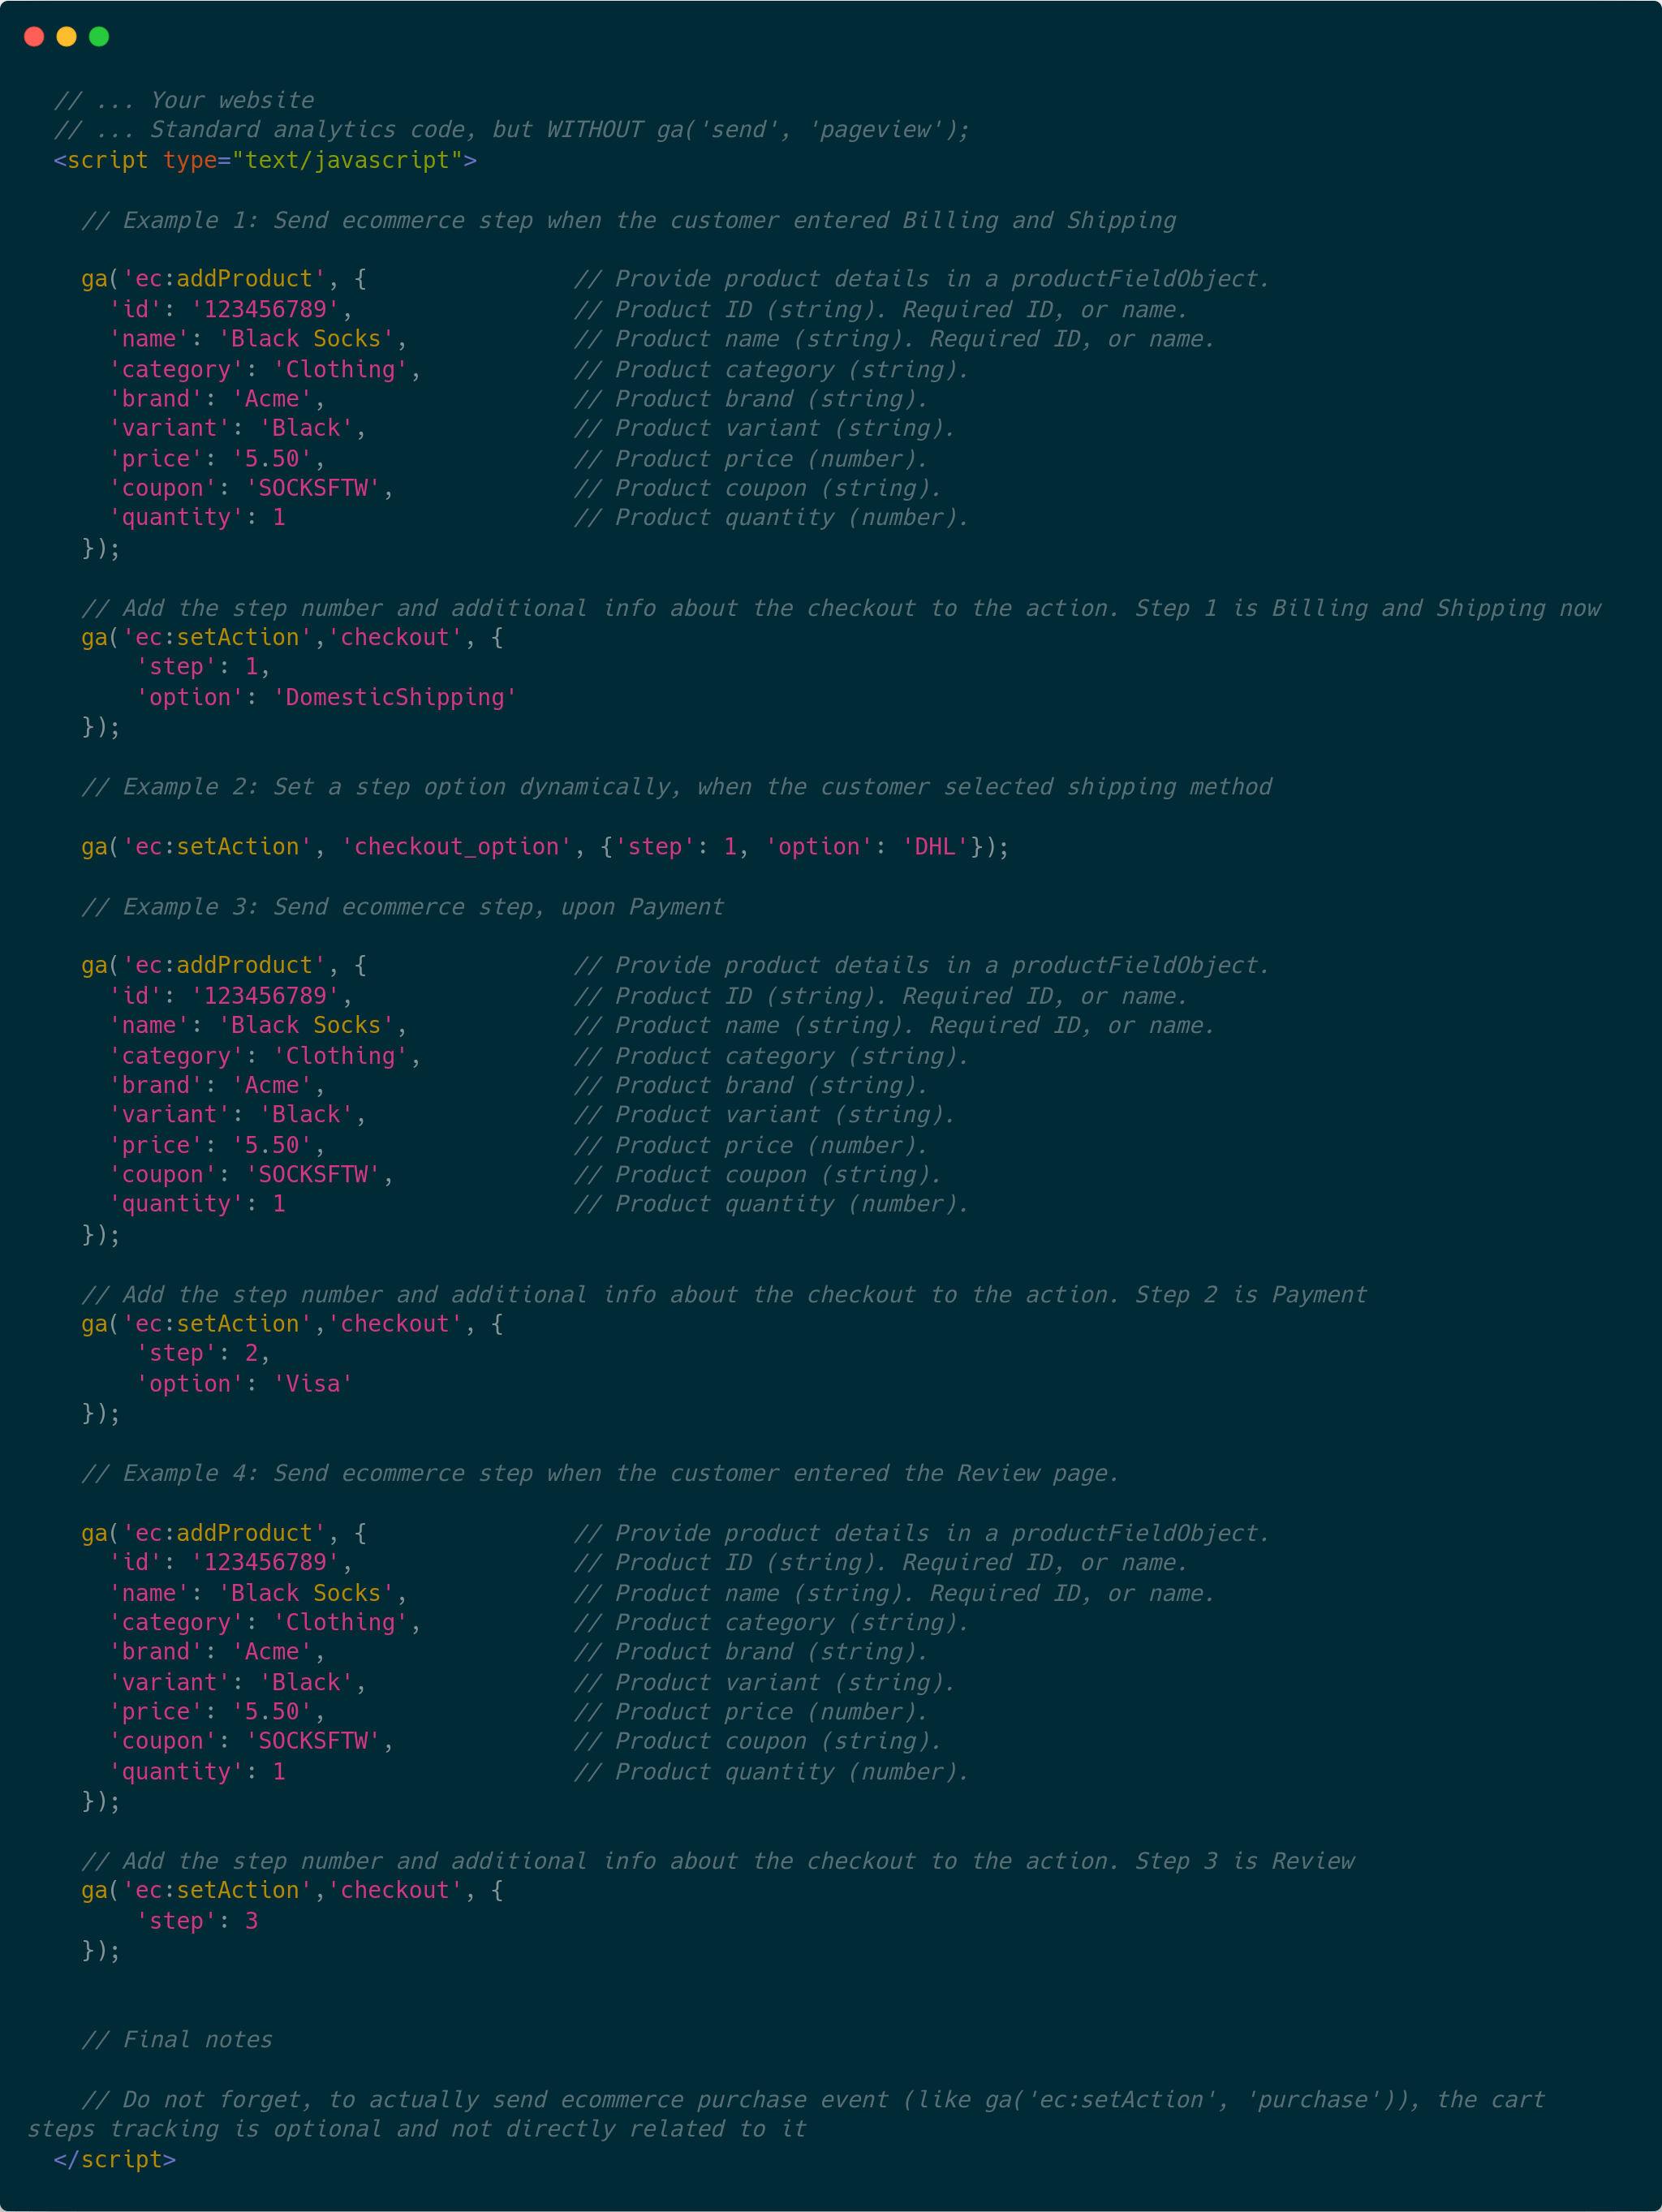
Copy this Snippet
  // ... Your website
  // ... Standard analytics code, but WITHOUT ga('send', 'pageview');
  <script type="text/javascript">

    // Example 1: Send ecommerce step when the customer entered Billing and Shipping

    ga('ec:addProduct', {               // Provide product details in a productFieldObject.
      'id': '123456789',                // Product ID (string). Required ID, or name.
      'name': 'Black Socks',            // Product name (string). Required ID, or name.
      'category': 'Clothing',           // Product category (string).
      'brand': 'Acme',                  // Product brand (string).
      'variant': 'Black',               // Product variant (string).
      'price': '5.50',                  // Product price (number).
      'coupon': 'SOCKSFTW',             // Product coupon (string).
      'quantity': 1                     // Product quantity (number).
    });

    // Add the step number and additional info about the checkout to the action. Step 1 is Billing and Shipping now
    ga('ec:setAction','checkout', {
        'step': 1,
        'option': 'DomesticShipping'
    });

    // Example 2: Set a step option dynamically, when the customer selected shipping method

    ga('ec:setAction', 'checkout_option', {'step': 1, 'option': 'DHL'});

    // Example 3: Send ecommerce step, upon Payment

    ga('ec:addProduct', {               // Provide product details in a productFieldObject.
      'id': '123456789',                // Product ID (string). Required ID, or name.
      'name': 'Black Socks',            // Product name (string). Required ID, or name.
      'category': 'Clothing',           // Product category (string).
      'brand': 'Acme',                  // Product brand (string).
      'variant': 'Black',               // Product variant (string).
      'price': '5.50',                  // Product price (number).
      'coupon': 'SOCKSFTW',             // Product coupon (string).
      'quantity': 1                     // Product quantity (number).
    });

    // Add the step number and additional info about the checkout to the action. Step 2 is Payment
    ga('ec:setAction','checkout', {
        'step': 2,
        'option': 'Visa'
    });

    // Example 4: Send ecommerce step when the customer entered the Review page.

    ga('ec:addProduct', {               // Provide product details in a productFieldObject.
      'id': '123456789',                // Product ID (string). Required ID, or name.
      'name': 'Black Socks',            // Product name (string). Required ID, or name.
      'category': 'Clothing',           // Product category (string).
      'brand': 'Acme',                  // Product brand (string).
      'variant': 'Black',               // Product variant (string).
      'price': '5.50',                  // Product price (number).
      'coupon': 'SOCKSFTW',             // Product coupon (string).
      'quantity': 1                     // Product quantity (number).
    });

    // Add the step number and additional info about the checkout to the action. Step 3 is Review
    ga('ec:setAction','checkout', {
        'step': 3
    });


    // Final notes

    // Do not forget, to actually send ecommerce purchase event (like ga('ec:setAction', 'purchase')), the cart steps tracking is optional and not directly related to it
  </script>
If you would like to clear the cart, instead of sending it, use ga('ecommerce:clear');
You can also specify currencies in the ISO 4217 standard. To learn more, head to the Currency reference.
If your e-shop location is on a different domain to the main website, you should use a Cross-domain set up.
Do not mix Ecommerce tracking with the Enhanced Ecommerce tracking code! For more information about standard Ecommerce, see the previous section.
Ecommerce tracking on Google Tag Manager.
Although the general concepts of Ecommerce tracking on Google Tag Manager are the same, as implementing analytics.js, the actual implementation is different. You'll need to create a new standard data layer and push differently formatted ecommerce objects. Read more about this at Google Tag Manager support.
If your e-shop location is on a different domain to the main website, you should use a Google Tag Manager Cross-domain set up.
Shopify Google Analytics.
Shopify dramatically simplifies the implementation of Ecommerce tracking. You won't need to do any heavy JavaScript coding, only a few changes to the store, and enabling it on Google Analytics. Here's the full guide to know how to do this.
Woocommerce Google Analytics.
For WooCommerce, there are two steps. You could install Ecommerce tracking just like on a regular website, or use a 3rd party plugin, such as WooCommerce Google Analytics Integration. Either way, do not forget to enable it first on Google Analytics.
Ecommerce tracking on Android/iOS.
To use Ecommerce tracking on Android/iOS apps, you'll have to integrate Google Analytics via Analytics SDK. There are several ways you can send data to Google Analytics:
- Track Ecommerce events using Firebase SDK. It's the easiest way of ensuring that you're using the latest Google Analytics version. Here you can find the Android or iOS versions.
- Or you can install a standalone version of Google Analytics Services SDK, which does not use Firebase. Under the hood, it uses the Measurement Protocol. Here you can find the Android or iOS versions.
If instead, you're searching for information on how to send Ecommerce information for a POS (point of sale) device, please refer to the Measurement Protocol developer guide. However, the Measurement Protocol is not ideal for websites or mobile apps, so you should first try and use the previously defined methods.
Google Analytics Ecommerce reports
Standard GA Ecommerce Reports.
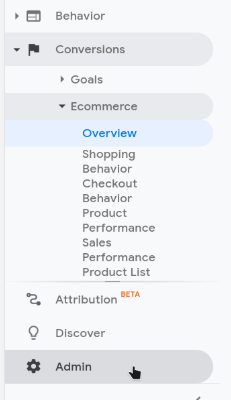
After enabling Google Analytics Ecommerce tracking, and especially Enhanced Ecommerce, you'll see a few new reports under the "Conversions" -> "Ecommerce" section.
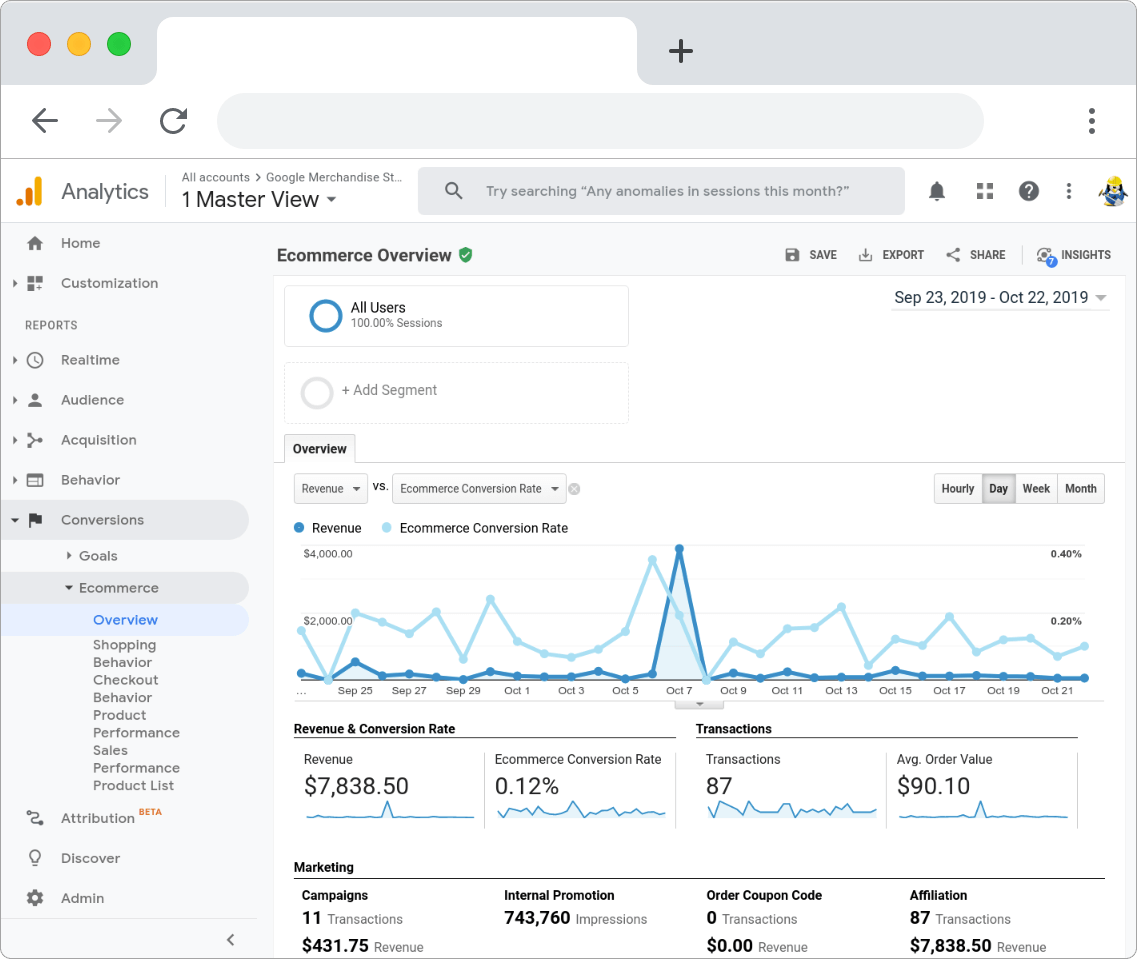
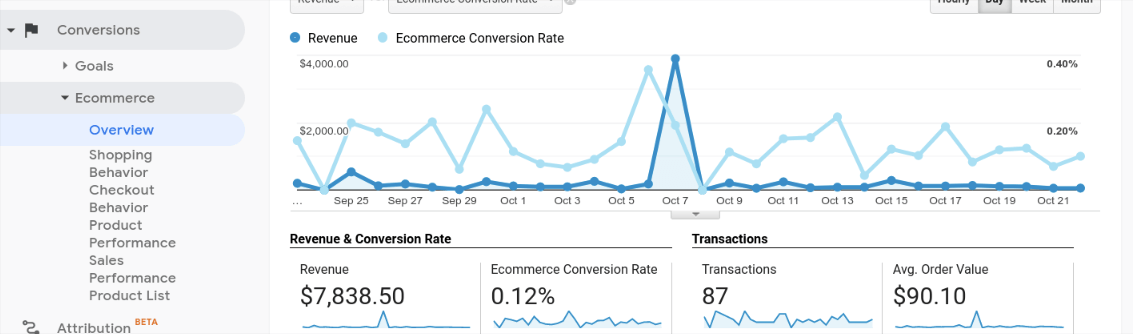
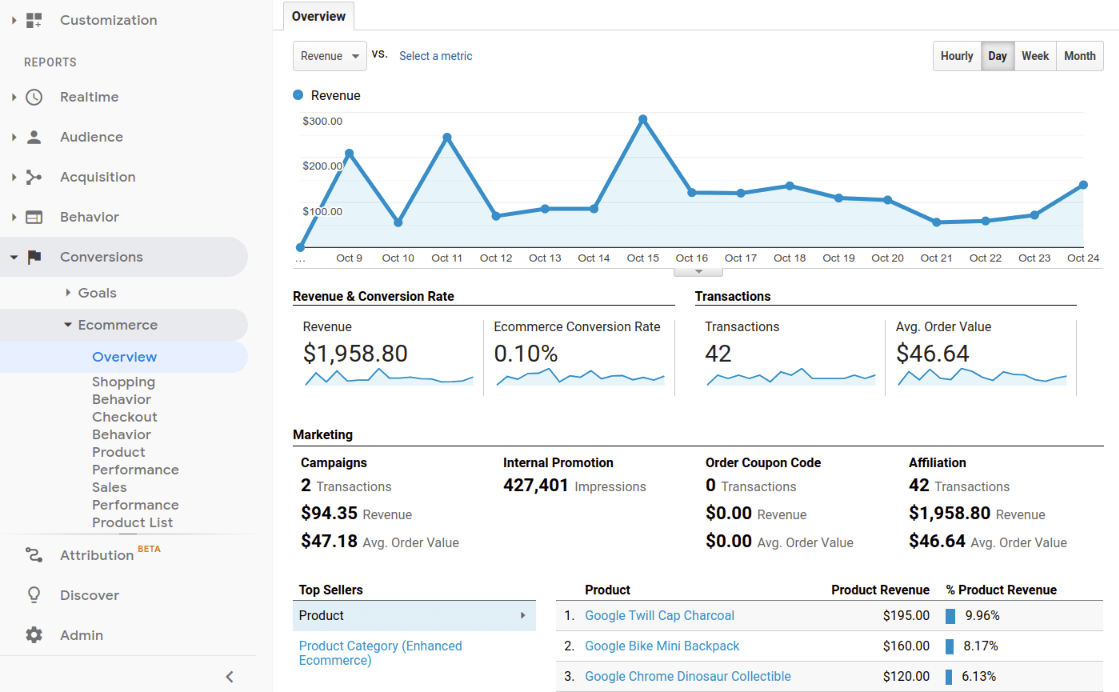
1. General Ecommerce Overview Report
This report is similar to the other "Overview" sections and gives you a broad insight into what's happening with your ecommerce business. You can see how many sales you are making, the average transaction value, and the top products/categories/brands.
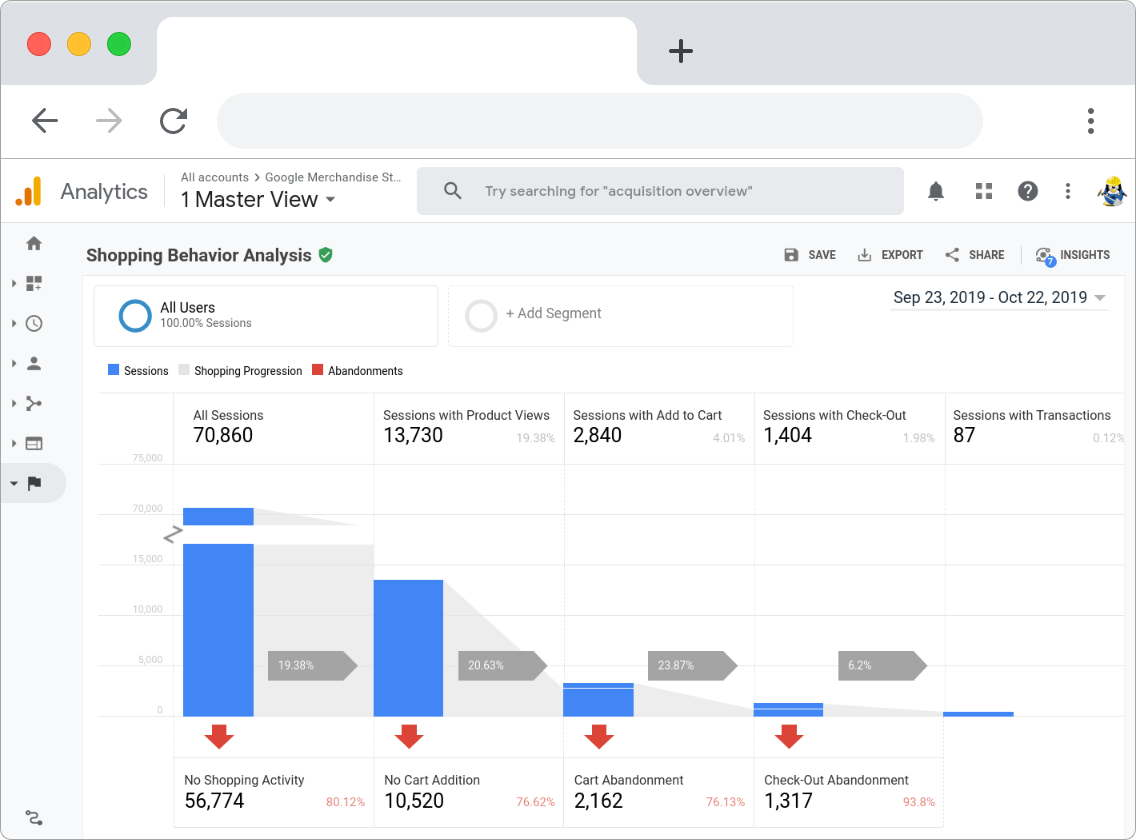
2. Customers Shopping Behavior Report (only on Enhanced Ecommerce)
This report shows you your customer shopping behavior funnel. You can see how many users participated in any shopping activity and how many abandoned their carts or left the checkout process.

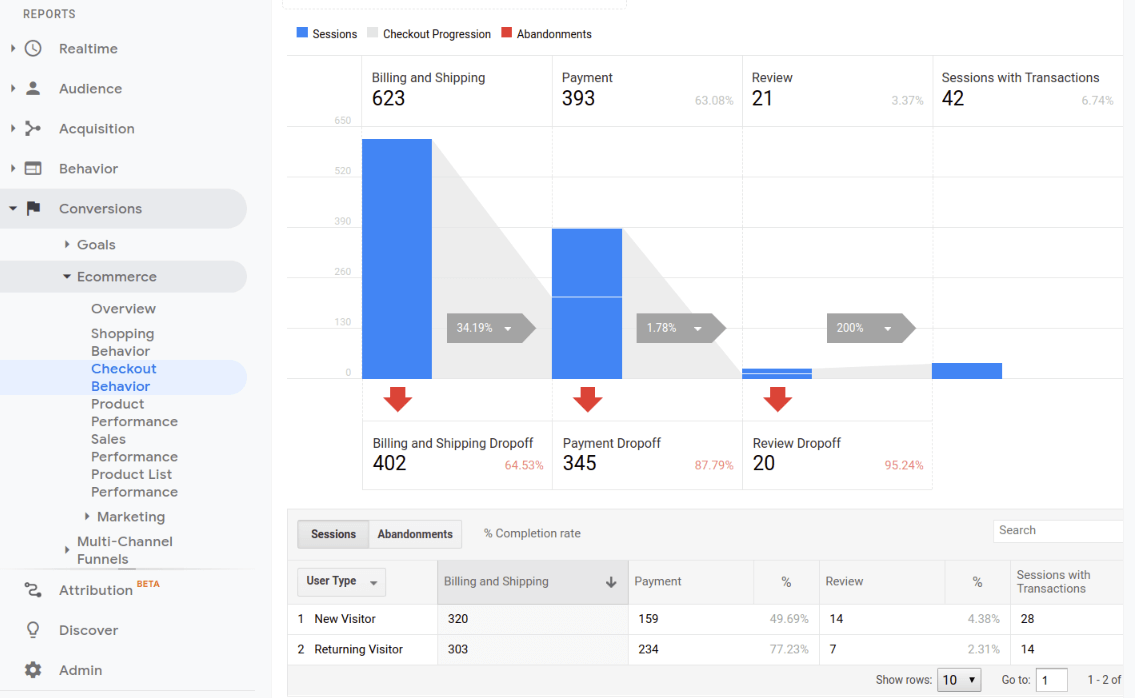
3. Customers Checkout Behavior Report (only on Enhanced Ecommerce)
Like the shopping behavior, checkout behavior shows you a funnel view, but it's only focused on checkout steps. Think about entering billing information, payment method, and cart review steps. If any of those funnel steps start leaking, it's crucial to fix them straight away. The customer already wanted to perform a purchase, but it didn't happen for one reason or another.
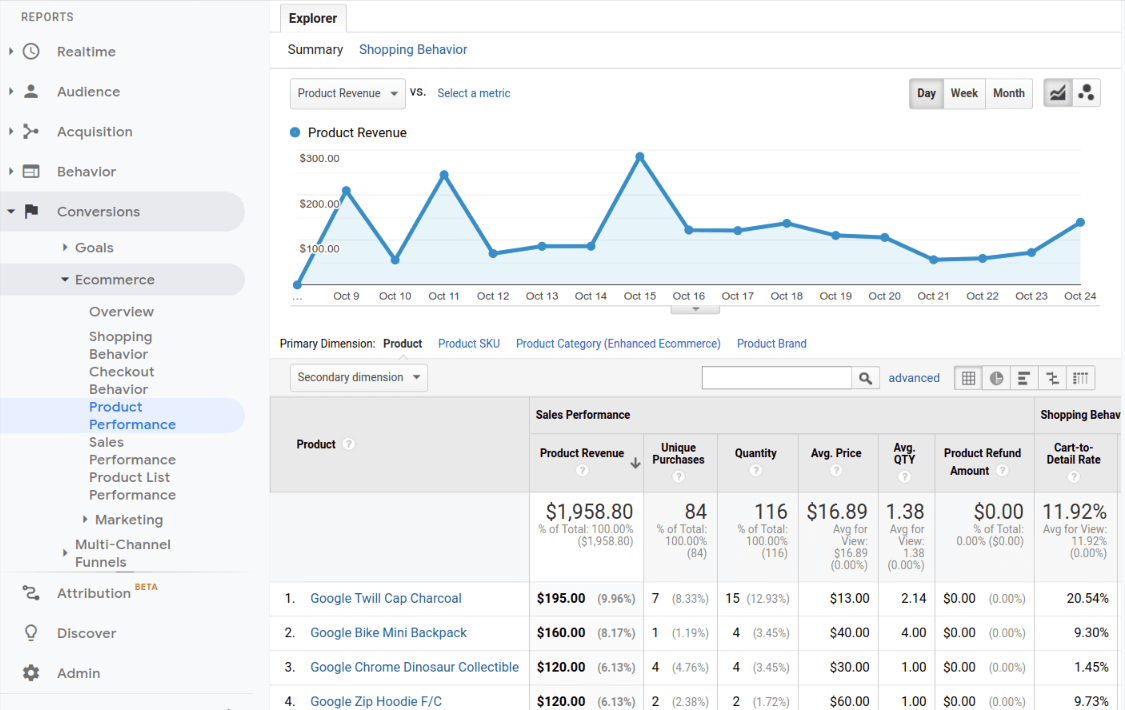
4. Ecommerce Product Performance Report
The product performance report combines sales performance and shopping behavior on the product level. It will show you the best selling products, their purchases,quantities, and how many of them were refunded, added, or removed from the cart. When you're using regular Ecommerce tracking, only sales performance data is displayed, as the shipping behavior report is not available.
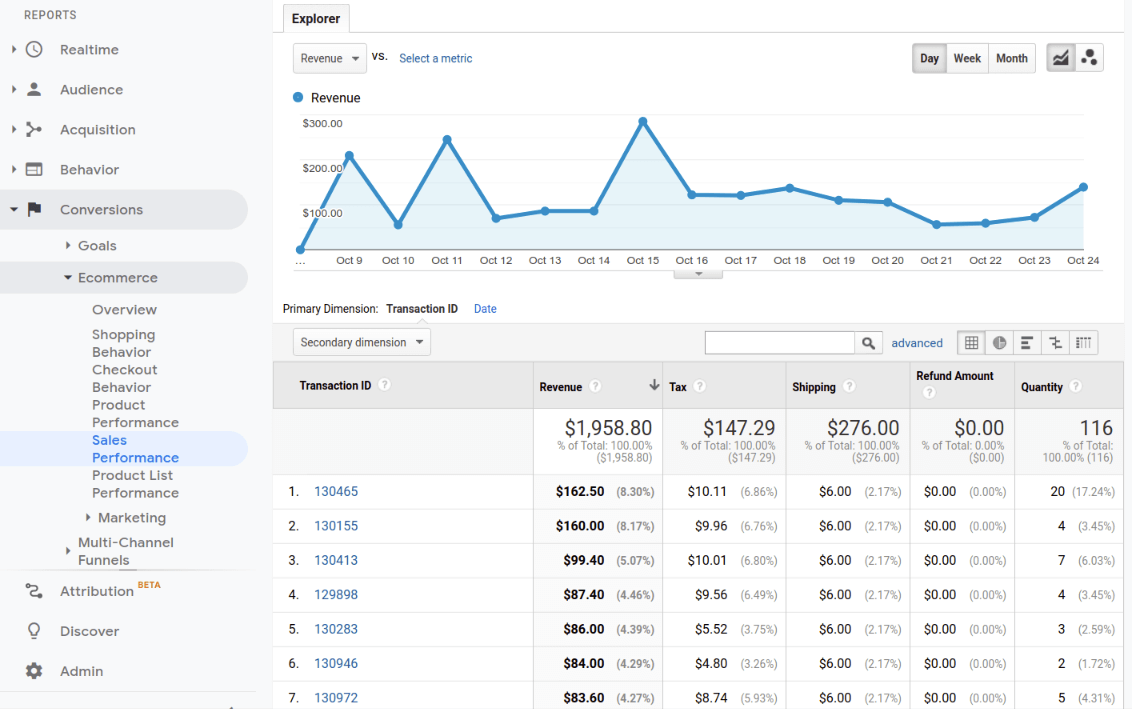
5. Ecommerce Sales Performance Report
The sales performance report is focusing on your transactions as a whole. So there you'll see all the monetary values like revenue, tax, shipping cost, and refunds. Keep in mind that when you're using regular Ecommerce tracking, you won't see all the numbers, such as refunds.
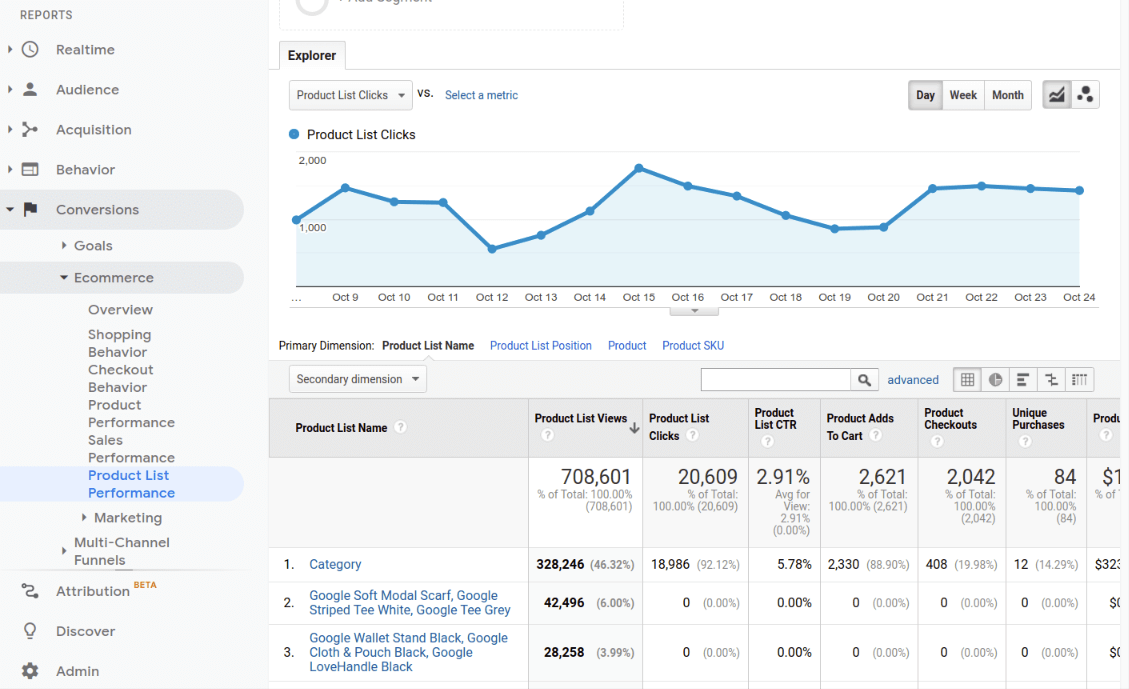
6. Product List Performance Report (only on Enhanced Ecommerce)
The final products list performance report will show you how well your listings work. It can be a categories page, internal search page, or sidebar promotions list. They all have different views/clicks/add to carts count, so you'll be able to know which lists perform better on your site.
If you're interested in more advanced ways of monitoring your ecommerce website, please head to the next section.
Advanced Ecommerce Reports with StatsGlitch
StatsGlitch weekly reports allow you to have a quick and clear view of your most essential ecommerce metrics, while also providing extreme customizability. At a glance, you can see your top-performing channels and user segments — for example, top-performing countries and traffic sources.
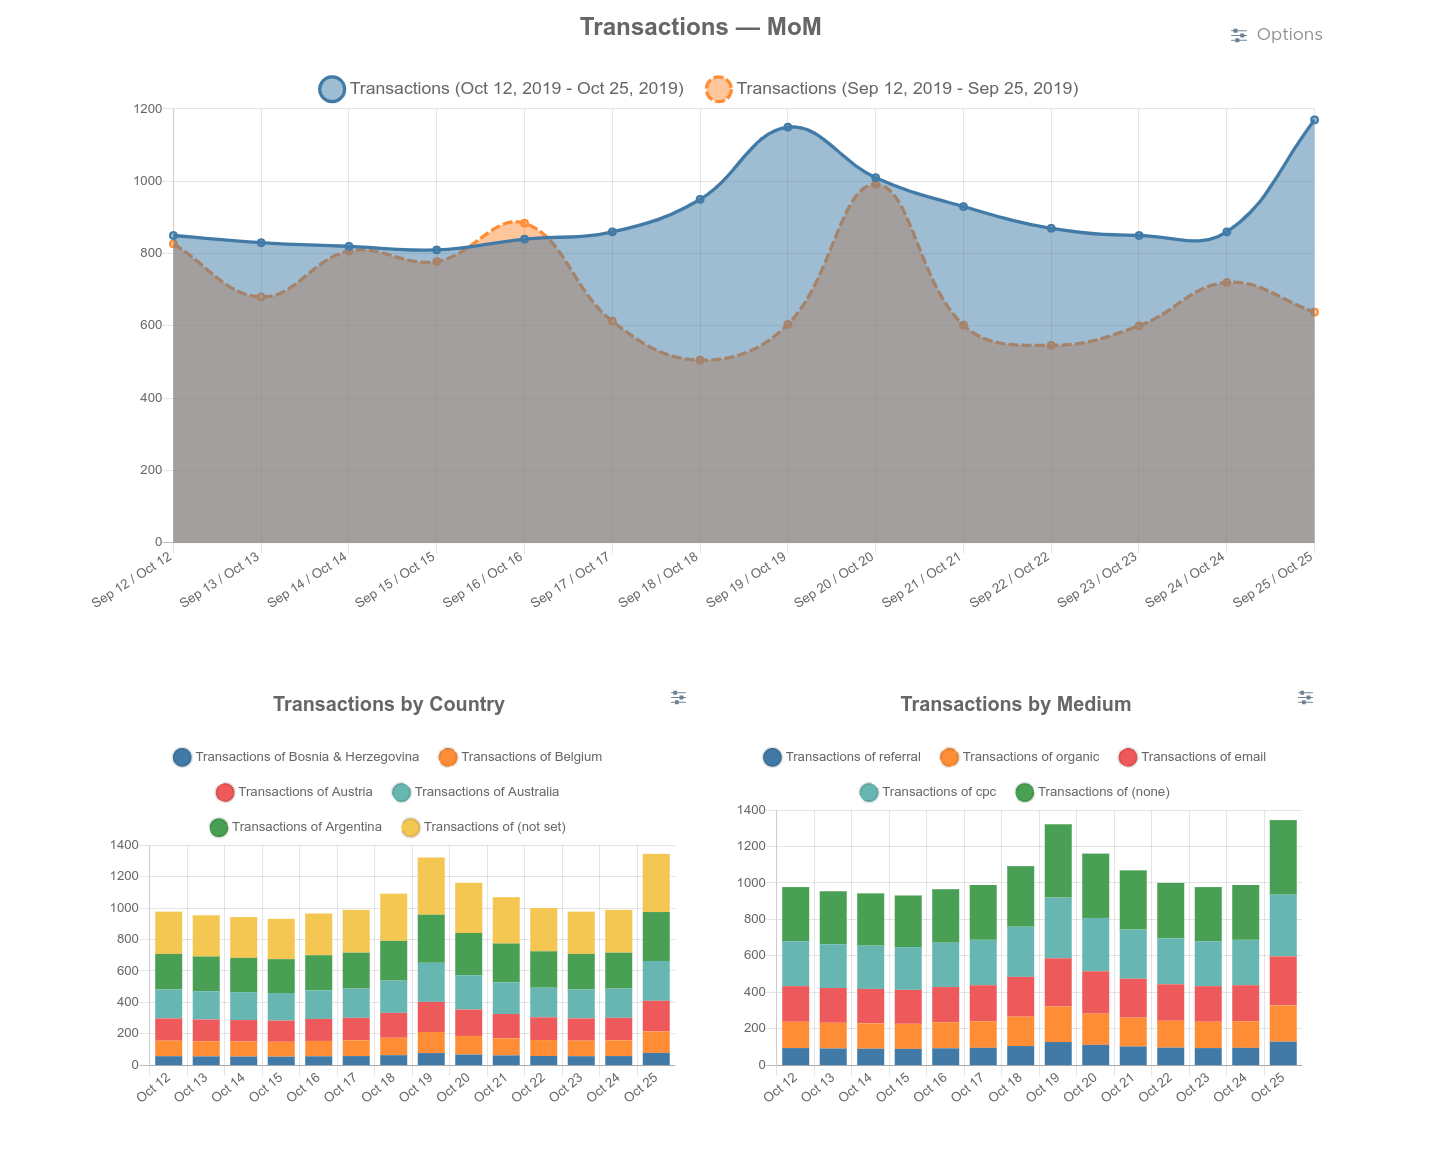
You can toggle between your ecommerce metrics instantly and see the whole picture of what went up and what went down.
Set up a weekly report to track your most important metrics, such as Transactions, Transactions Revenue, Total Sales, and Unique Purchases. StatsGlitch will even inform you if there were any National holidays. So you can consider this when investigating data fluctuations.
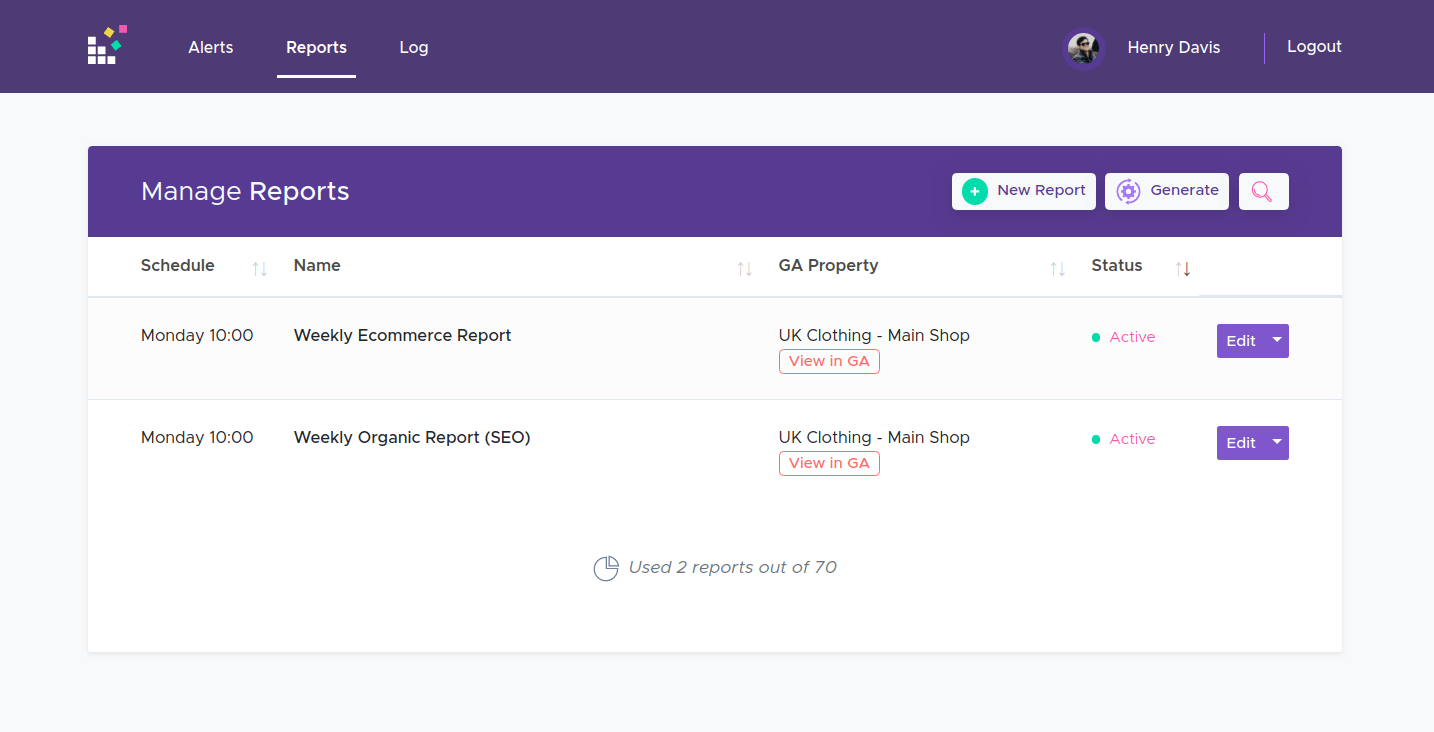
You can have weekly and daily reports, but for daily monitoring, we recommend using alerts. See the section below to find out more.
Google Analytics Ecommerce Alerts (Custom and Real-Time)
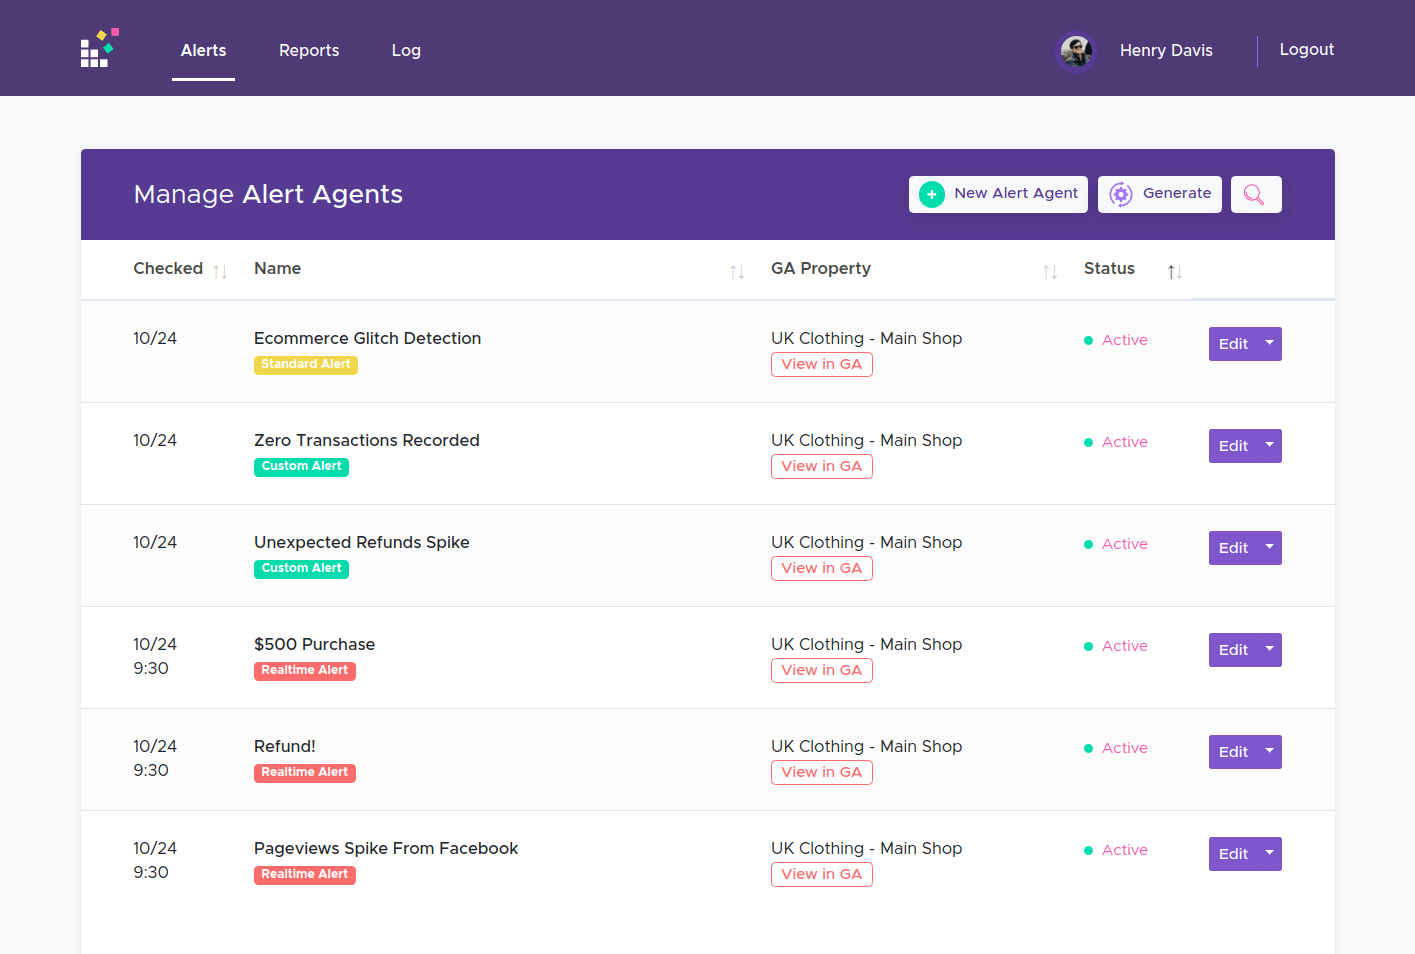
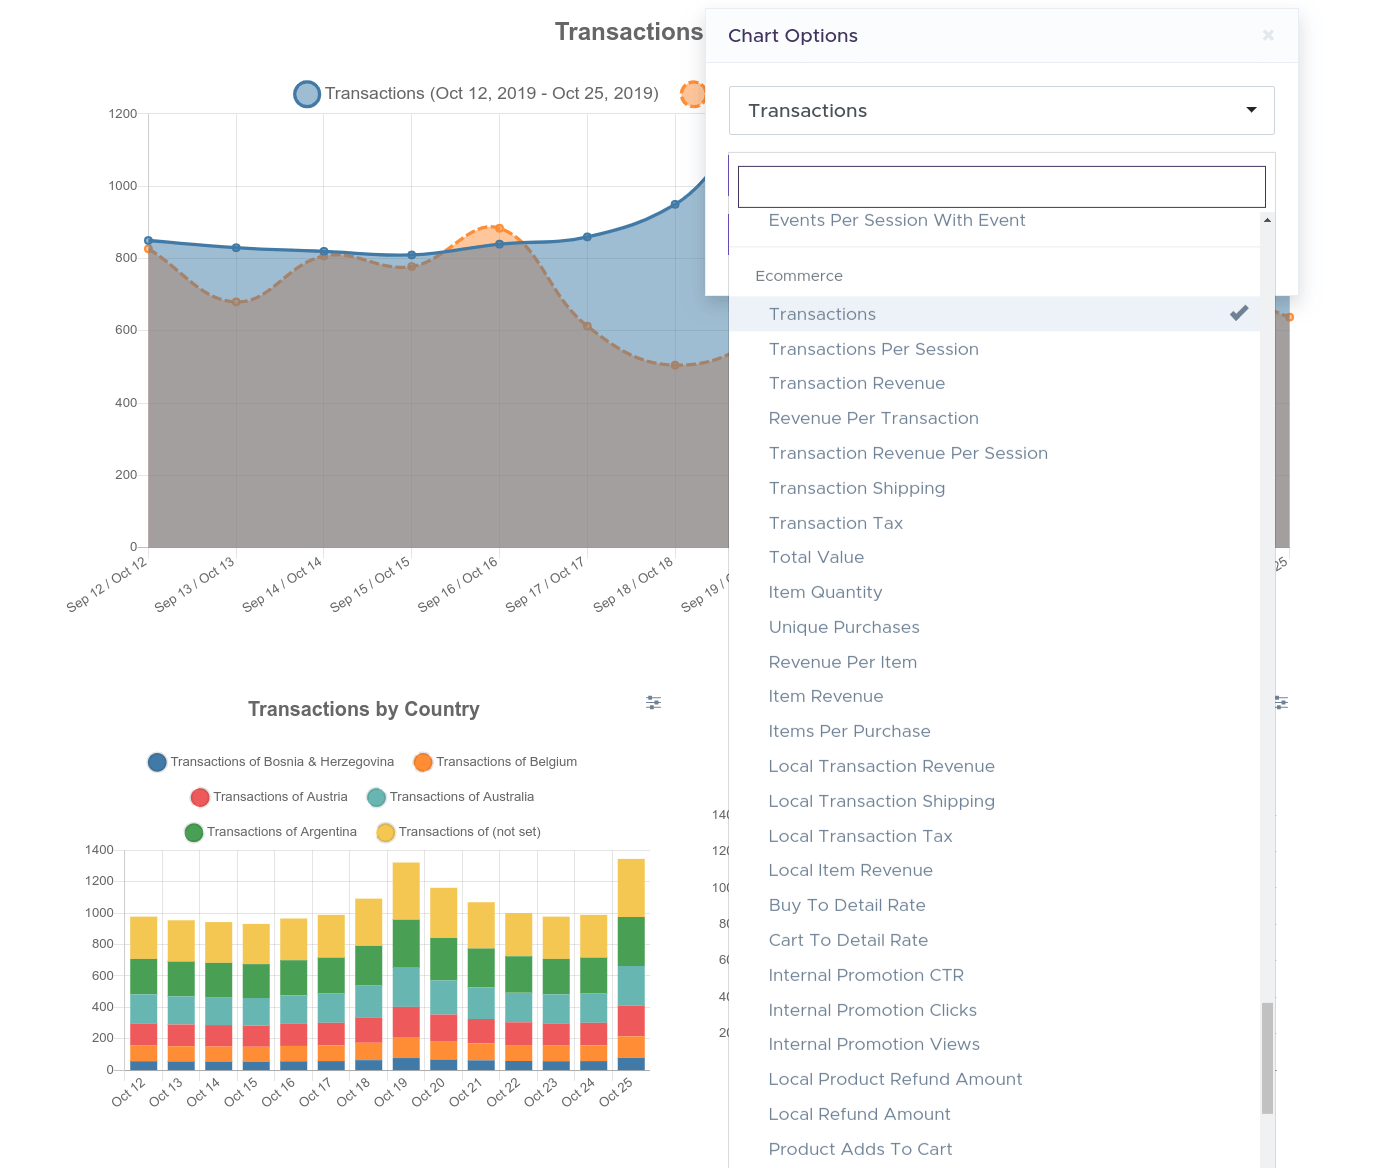
With StatsGlitch, you can track all kinds of different Google Analytics metrics. Here are the top most used metrics, for tracking ecommerce businesses. Every alert below is highly customizable, and you can adapt it to your specific needs. Treat them as general examples of what you can do. It can take a while to configure everything properly. But every alert saves you time, as you don't need to go to Google Analytics so often.
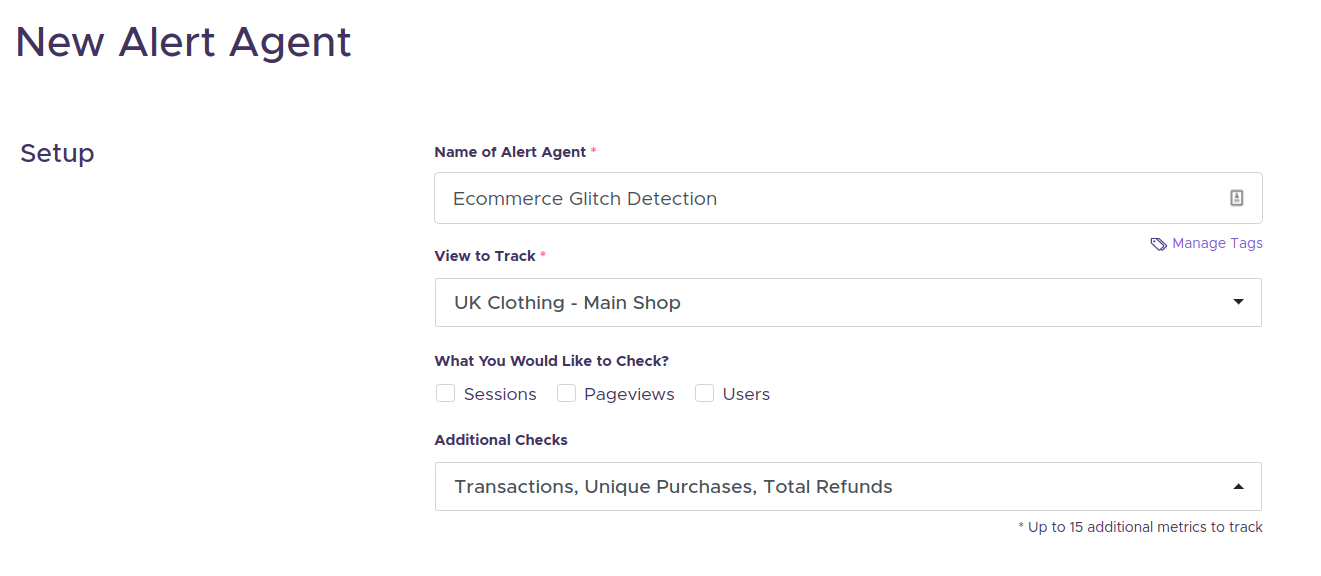
1. Ecommerce KPIs Glitch Detection
This alert informs you when something significant happens on your ecommerce website. It checks selected metrics using historical data and decides whether the spike (or fall) is statistically significant. If it is, you'll receive a notification via Email, Slack, or anywhere else (like internal admin) via Zapier. In this example, it’s tracking Transactions, Unique Purchases, and Total Refunds.
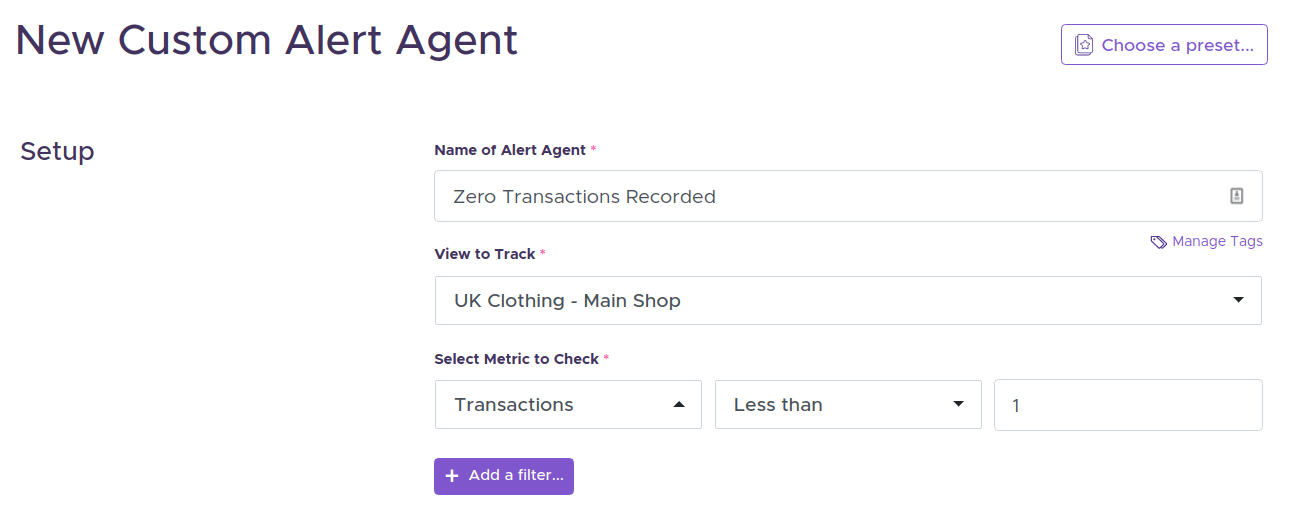
2. Zero Transactions Recorded
If your ecommerce website is quite popular, but not enough to dedicate your full attention, you can set up a custom alert to track if there were no sales recorded. This simple check will ensure that your Google Analytics tracking is in place, your checkout process is working, and your website, in general, is working fine.
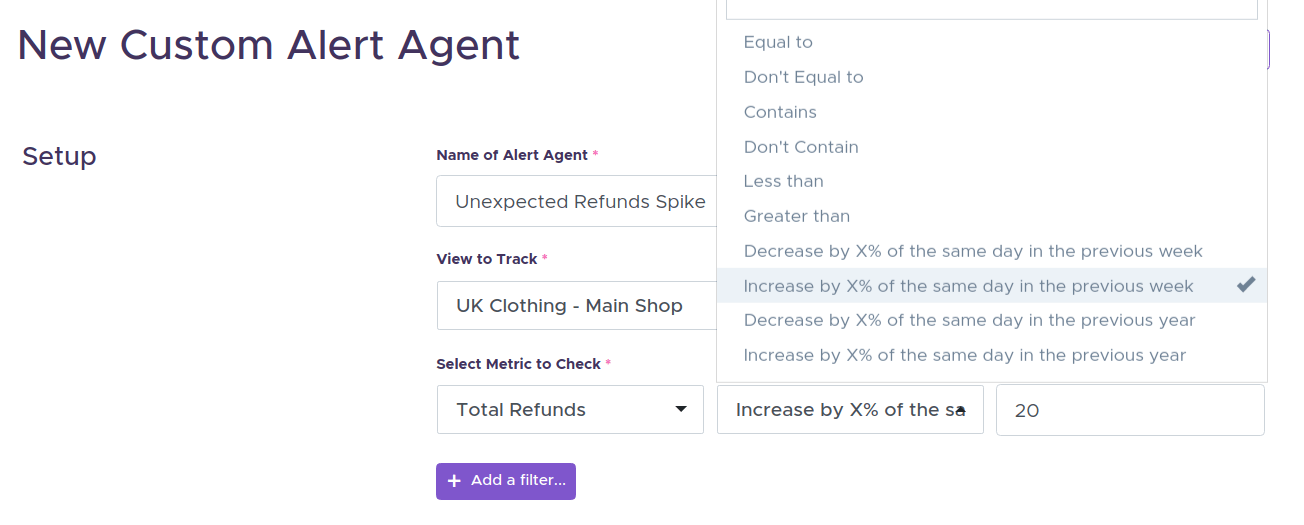
3. Unexpected Refunds Spike
All businesses don't like to deal with refunds, but it's a reality. Your ecommerce store will also have returns. should track them and ensure that the rate of them is as expected. A high refund rate might signal that there are problems with your inventory or a particular product. Set up a refund check to see whenever they've increased more than 20% compared to the last week, and you should be safe more or less.
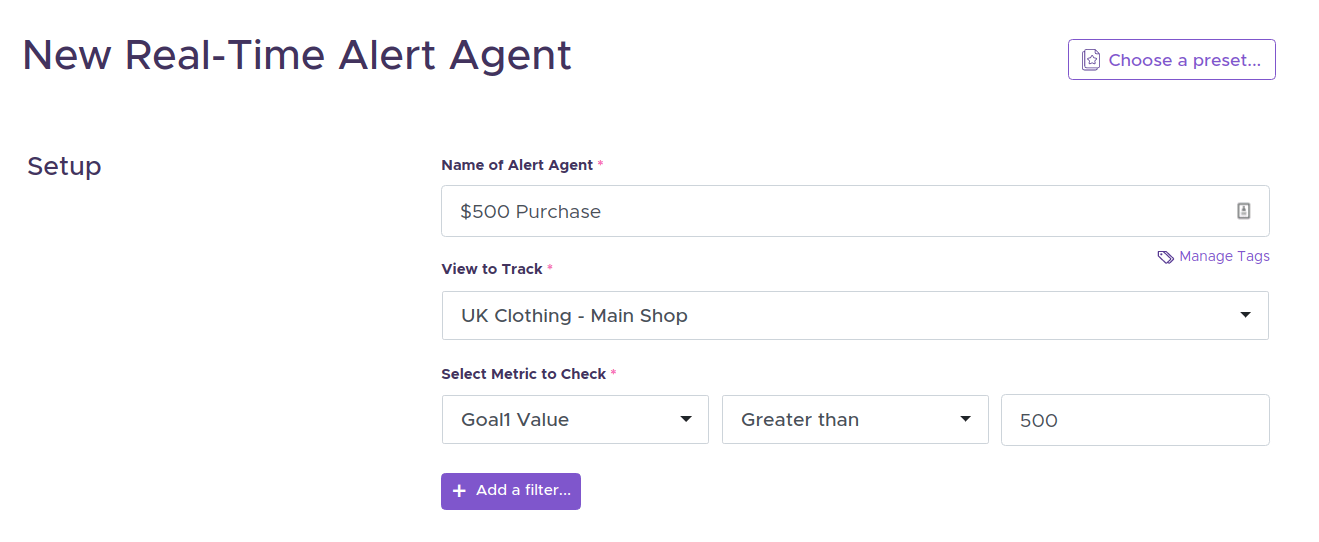
4. Real-Time Alert - $500 Purchase
Who doesn't like to celebrate? We're all social beings, so receiving an alert every time a customer purchases something for $500 seems like a perfect mood booster. Associate your transaction data with Google Analytics Goals, set the Goal Value to the purchase amount, and you're ready to create this kind of alert.
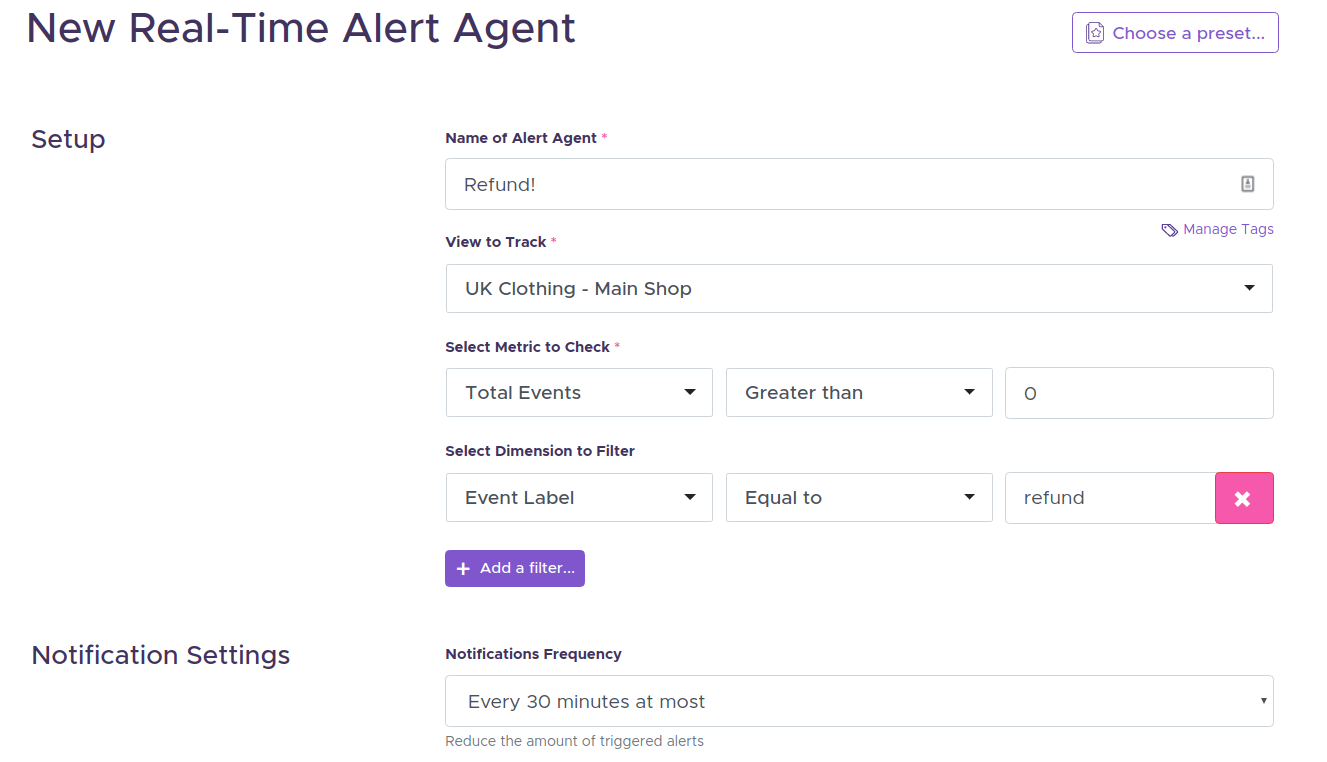
5. Real-Time Alert - Refund
While celebrating a sale is pleasant, it also might be crucial to track and investigate all refunds. Send the refund event to Google Analytics, and you can se tup a real-time alert every time a customer requests it. You can get a notification via Email/Slack, or your internal admin via Zapier.
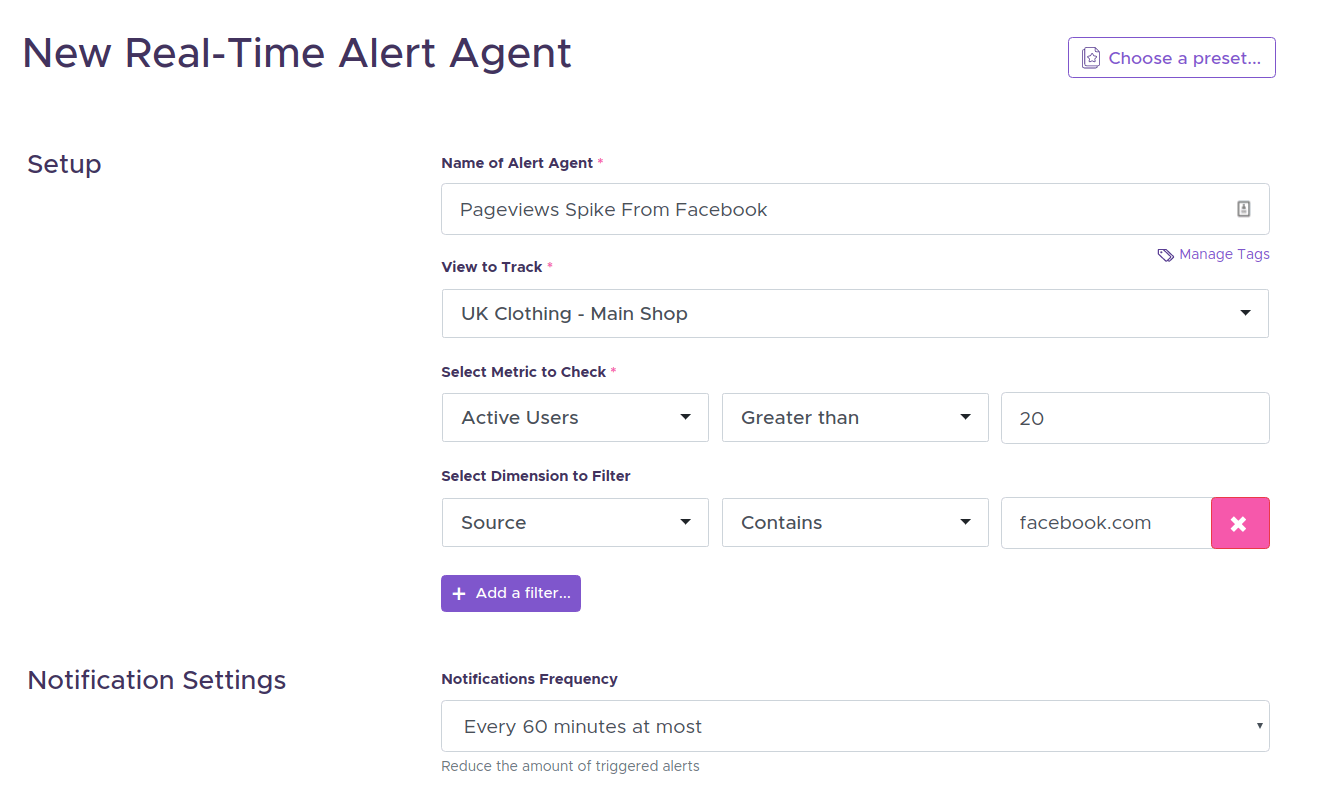
6. Real-Time Alert - Pageviews Spike From Facebook
The last example becomes handy if you perform some social network campaigns. You can receive a notification when there's a sudden spike from Facebook, Pinterest, or any other website. You'll know that your promotion is working and can push it further on that platform right now, not waiting for tomorrow’s results.
Combining Alerts and Reports is usually the key to successfully reducing time spent on Google Analytics, and increasing your business awareness.
How to track what really matters.
Focusing on everything usually leads to knowing nothing. If you're running an ecommerce shop, you should have your main KPIs (Key Performance Indicators) defined. Commonly used KPIs are:
- Total Revenue
- Transactions/Sales
- Refunds
Ask yourself this question, what metric defines your business as successful or unsuccessful? The answer is usually your KPI, so you should make sure you stay on top of it. Create custom or real-time alerts or check it on Google Analytics directly.
Then, it would help if you thought about what other metrics impact your KPI. These are also important to check, but a weekly check is usually sufficient. Create weekly overview reports, or have a routine to check those manually on Google Analytics, every week.
It would be best if you resisted creating too many reports and alerts, as it could be distracting, and you might lose your focus. Instead, once a month, revisit the previous two questions and make sure the answers are up-to-date.
Set up alerts focusing on main KPIs (like total revenue), but your weekly report might have a broader view, such as the average purchase amount or total products sold.
GA Ecommerce tracking common questions
Mismatching data on Google Analytics and Ecommerce store
Your ecommerce store might report different numbers than Google Analytics because of many reasons. If that's the case, you should treat your Google Analytics data as a representative distribution. You can make business decisions based on Google Analytics and support or reject the ideas. But for pure financial reports, trust your ecommerce platform instead. Here are the top explanations of why there might be a difference:
- Your customers are using JavaScript or cookie blocking solutions. Therefore the data never reaches Google Analytics in the first place.
- You have some errors in your JavaScript. Check whenever the transaction reporting page doesn't have any errors or ask your developer to do this.
- Your ecommerce store is a different timezone than Google Analytics View. For your convenience, you should always set them to the same timezone.
- You have refunded or canceled transactions that were not synced to Google Analytics.
Ecommerce transactions data is missing on Google Analytics
If all your transactions are missing in Google Analytics Ecommerce reports, there might be some problems:
- The transaction tracking is not implemented correctly in your order confirmation/thank you pages. Double-check that the JavaScript code responsible for tracking the purchase is there when a customer performs a transaction.
- Your payment gateway (such as Stripe or PayPal) doesn't redirect a customer to the "thank you" or order confirmation page.
- You're missing required fields to record Ecommerce transactions.
- The order of Ecommerce events is mixed with your other Google Analytics code. The actual order depends on whenever you use standard Ecommerce tracking or Enhanced Ecommerce.
- The Spotify/WooCommerce addon modifies your order confirmation page.
Now you know:
- What Google Analytics Ecommerce is
- How it can benefit your business
- How to set up Google Analytics Ecommerce tracking
- How to use Ecommerce Reports and Alerts like a pro